In this post, we are going to tell 10 pregnancy poses that you should for a healthy baby.
Introduction to yoga
Yoga will really help you flow with the changes in your body. Increase self-awareness and your connection with the body as well as increased awareness of the baby inside of you. It can really help strengthen the connection between the woman and the pregnancy as well as the connection between the woman and the growing baby inside
Pregnancy sometimes causes changes in the body that develop muscles that are tense and unbalanced and this causes an imbalance between the muscles in the bone structure of the body and it can cause a real feeling of disconnection to the ground below.
Yoga can really help restore that balance helping you feel more stable and stronger and providing your baby with a more comfortable pregnancy as well as providing yourself with a more comfortable pregnancy.
Before doing these exercises you shouldn’t eat a big meal. Find the time that you can concentrate on the exercise without distraction. The awareness and concentration are a big part of creating and strengthening the connections between you and yourself you in the pregnancy end between you and the baby.
Find a place that has a carpet and a free wall a few pillows can help and a stool as well. A physiotherapy ball, if you have one, can help with some of these exercises but you don’t need it so you don’t have one that’s “OK”
Yoga 1 – Cat cow
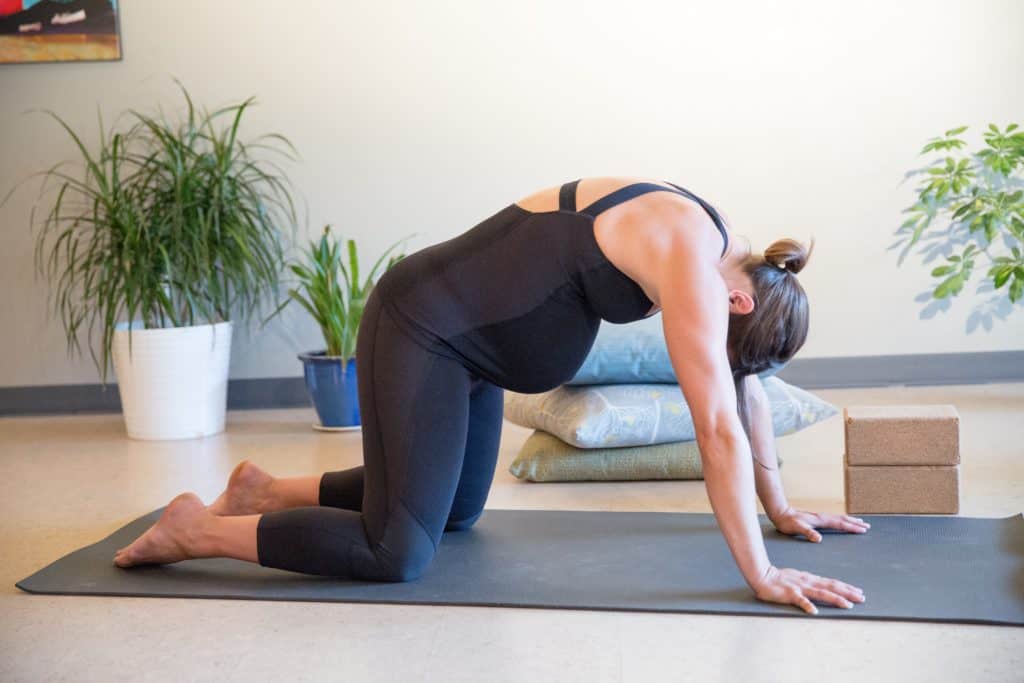
It’s a really good one to start off with for a number of reasons, especially in pregnancy. It brings ease back pain which can be a big problem. It’s a fairly easy one to do and especially if you haven’t got a lot of yoga before. This is a great place to start.
So you want to keep your shoulders right above your hands and your hips above your knees. It’s important to keep these 90-degree angles with the position that you’re in and not be too forward or too far back there for putting pressure on unwanted parts of your body like your wrists or your knees. So find this comfortable position with 90-degree angles hips above your knees and your shoulders above your wrists.
Feel yourself sturdy in this position and take a couple of deep breaths, inhale and exhale. Feel the sturdiness of your body as you’re taking the deep breaths to feel yourself in the proper position. You’re going to start arching your back up and bringing your chin right into your chest, as you’re in this position, take some deep breaths and then gently transition to the opposite where you push your stomach down to the floor bring your head up looking at the ceiling if you can.
Back into the cap position. Make sure that your transitions are gentle moving slowly between the cat and the cow. And as you’re doing the cat. Don’t be too aggressive. Get in a position that’s comfortable without exerting too much force as you’re pushing them back up.
Make sure you concentrate on your breathing when you’re doing this and you can do this in two ways. You can move a little bit quicker between the physicians doing inhalation as you do the cow and then exhale as you do the cat or you can take a deep breath in each position doing a bit slower transitions see what’s good for you. And this really brings flexibility the lower back and it helps reduce back pain.
Yoga 2 – Figure 8 on hands and knees
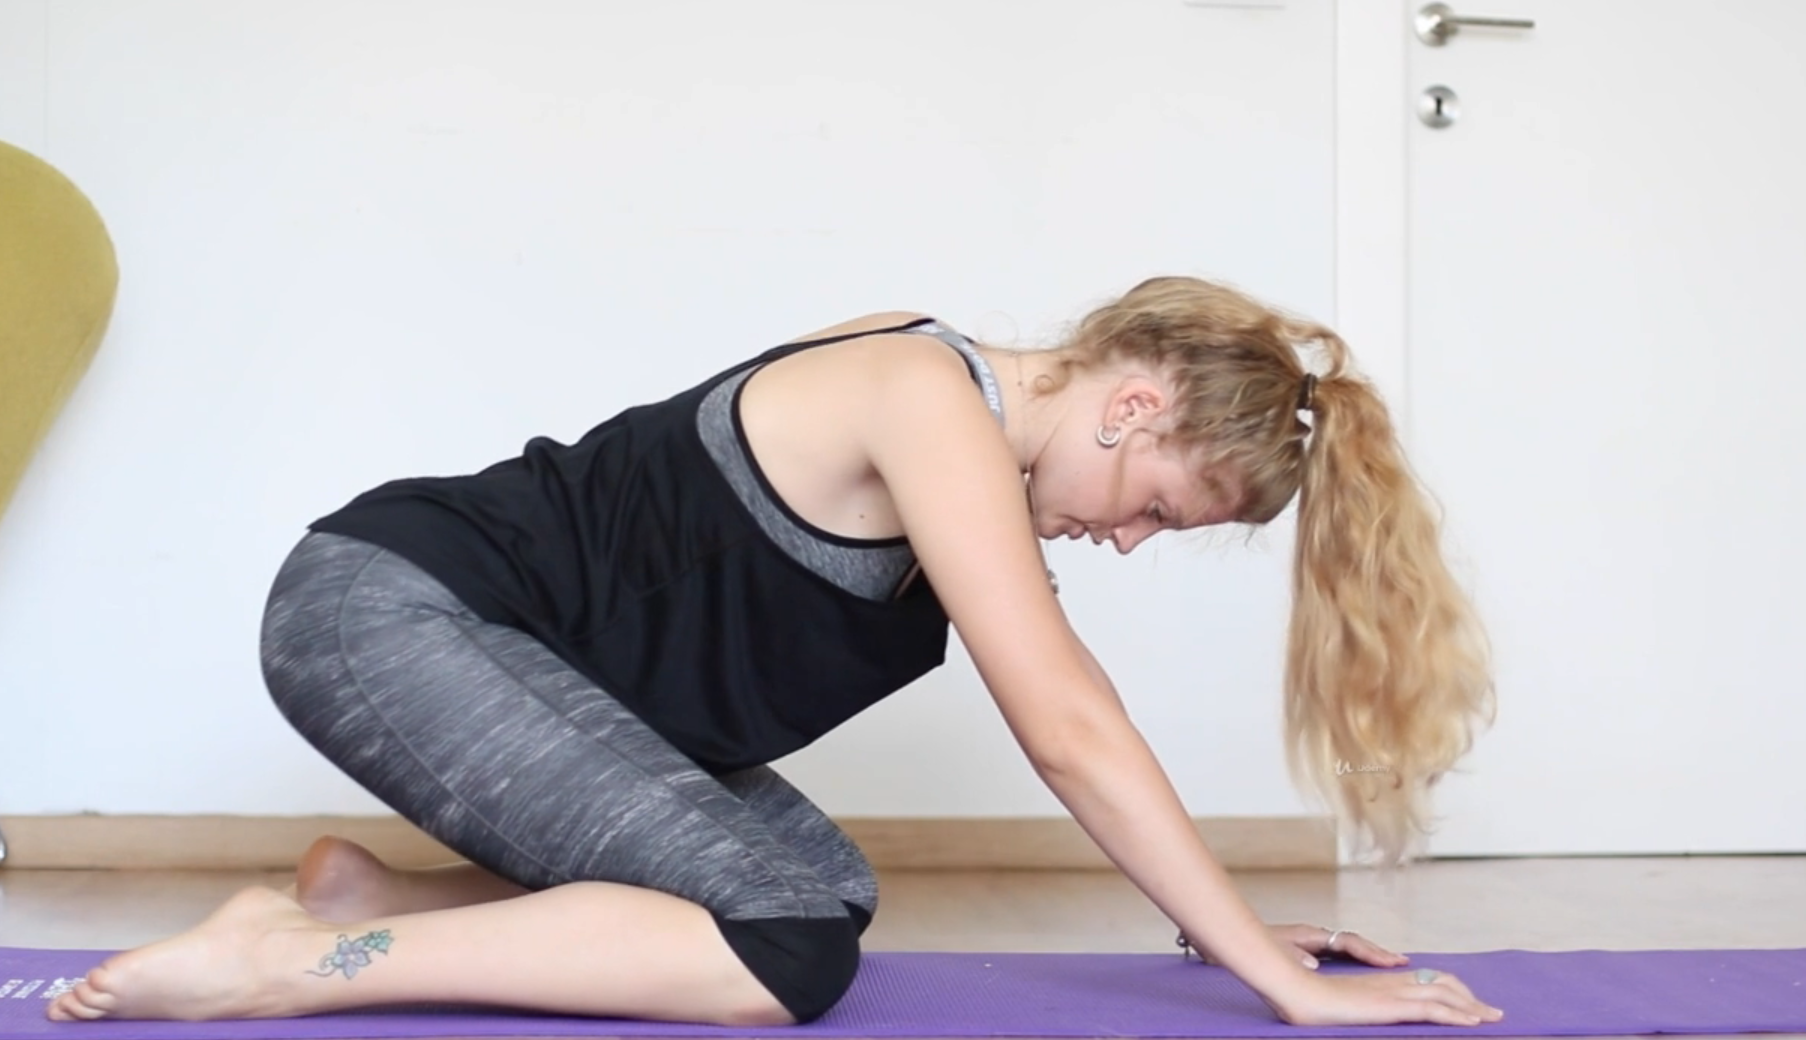
We’re going to practice one of the great positions that you can do while you’re having contractions at home or at the hospital. And this position is great during contractions because it will help you deal with the tension of the uterus. It also helps release some of the tension that you control helping the cervix to continue dilating and helping the baby navigate its way down the birth canal. Moving things along for you and the baby.
Now it’s going to be done in her hand and hands and knees similar to the cat-cow position. Make sure that your shoulders are directly above your wrists and your pelvis directly above your knees causing 90-degree angles between each of the joints of your body. When you feel stable in this position go ahead and take some deep breaths really paying attention to the different parts of your body as you do this. Listen to what your body is telling you.
After some deep breaths go ahead and do five circles to each side. Want these circles to be big and slow. Breathing with each movement feeling the release and the relaxation as you do it. Making sure that you’re breathing deeply and as you finish the Five times in one direction switch directions another five big circles in the other direction.
When you did this, go ahead and do figure eights again with slow movements. Really feel the pelvis the hips and the back stretching in each direction as you move slowly in gentle movements.
And once again when you finish the figure eights you can go back to rocking back and forth. If want you can lift up one of your knees as you’re rocking back and forth placing your foot on the floor so that you’re half standing half kneeling. This can help the back and forth motions.
Again this is a great exercise to do during contractions and positions that you do during contractions need to be practiced beforehand so that you feel comfortable with the motions and the positions and they come naturally to you. The breathing also needs to be practiced to make sure that you can continue breathing normally and slowly throughout the positions.
Yoga 3 – Cooldown
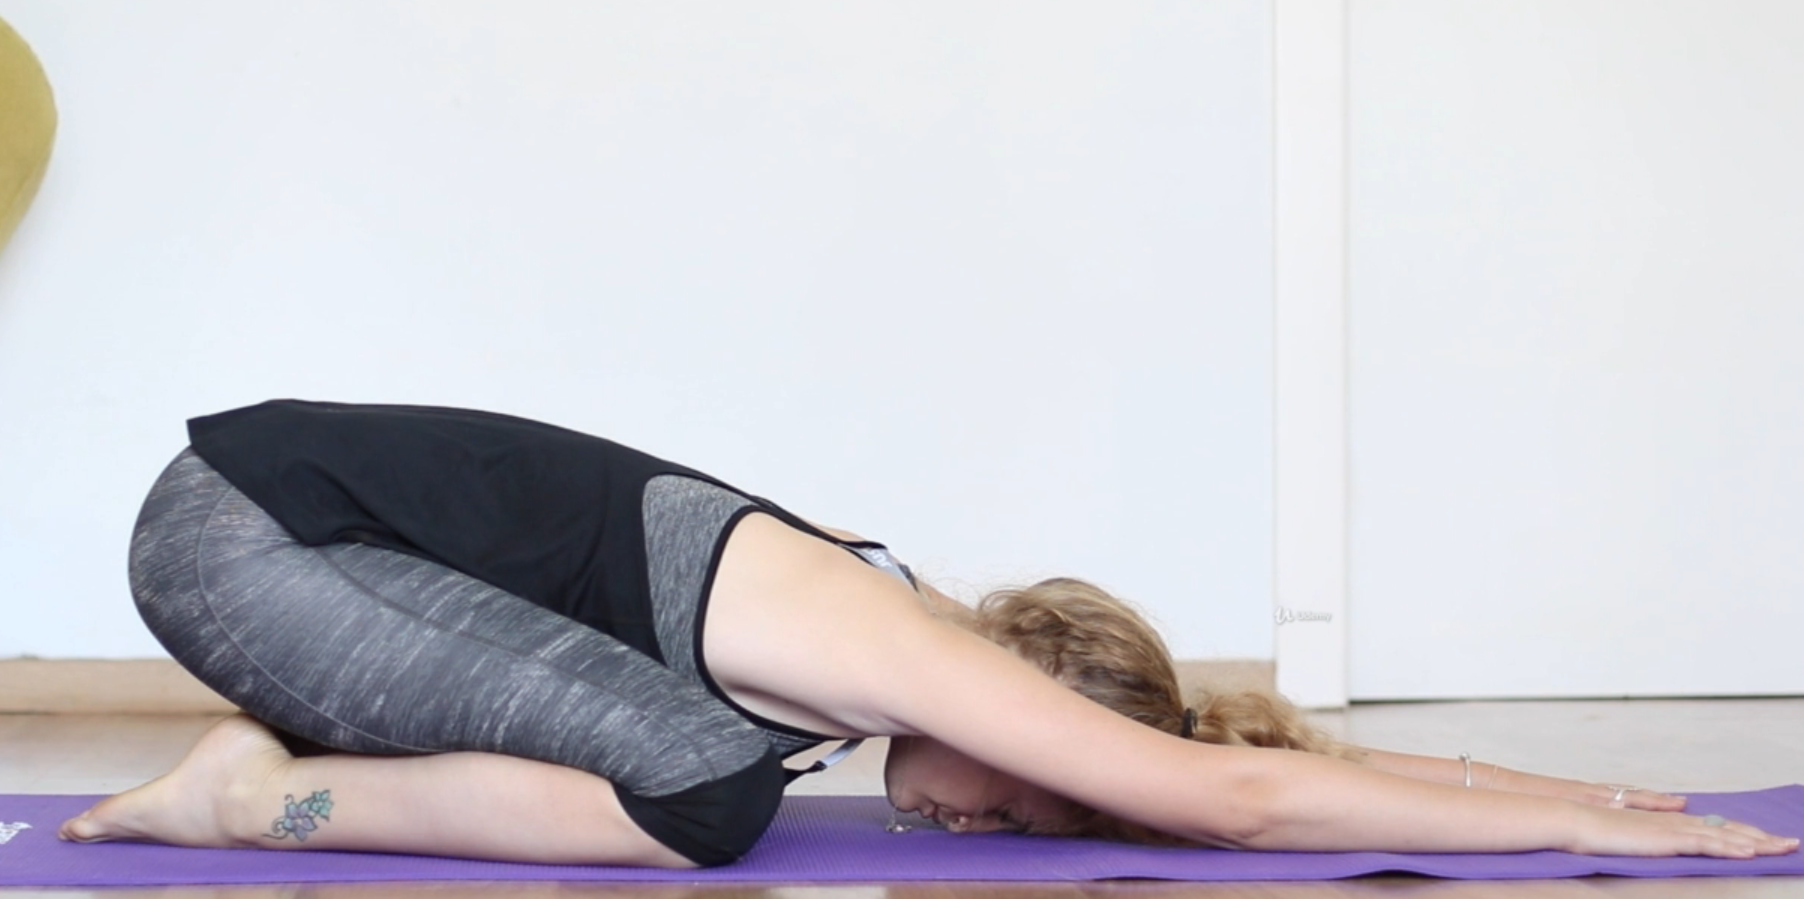
We’re going to talk about the cool down. A great way to end the yoga session. This is another position that’s really good to do during contractions. For all of the same reasons that we talked about earlier. Encouraging cervical dilation, helping the baby navigate its way through the birth canal, and relaxing some of the tension that prevents the birth from advancing.
Now, this exercise has four positions that you’ll do consecutively one after the other. You start by sitting on your knees with your heels together. And there can be a little bit of space between your knees and as you progress through the pregnancy the amount of space make it a little bit more to make way for the stomach that’s going to be there. Sit comfortably with your hands on your knees and your back up straight. Taking some deep breaths, that’s the first position
The second position that we’re going to get to during this exercise is moving your hands from your legs to the floor. Put your hands on the floor and once again sit down on the heels of your feet, back straight and breathe normally. Your hands are flat on the floor between the knees and you’re comfortable putting a little bit of weight on your hands but not too much. You can feel the stretcher in the pelvic bones.
The third position here is when you take your forearms. Put them on the floor put a little bit more weight now onto your arms. Take a few deep breaths and feel the release of tension in your body as you’re doing this exercise. Lastly, stretch your hands out as far forward as you can reach while still sitting on your heels. Once you’ve gotten to this position you can lower your head putting your forehead on the floor taking some deep breaths with every time you exhale feel the tension being released from your body you feel your muscles relax and a little bit more. You can feel this relaxation from the tips of your fingers to your wrists elbows shoulders waist and pelvis. Right down to your groin muscles taking deep breaths.
This really helps release the tension. Also in your back muscles. You can really feel the back muscles stretched out and getting more flexibility as you’re doing this exercise. Make sure that you do this one weekly or biweekly to increase flexibility and be comfortable with this exercise so that you can do it properly when the contractions come.
Yoga 4 – Knee rotation on the back
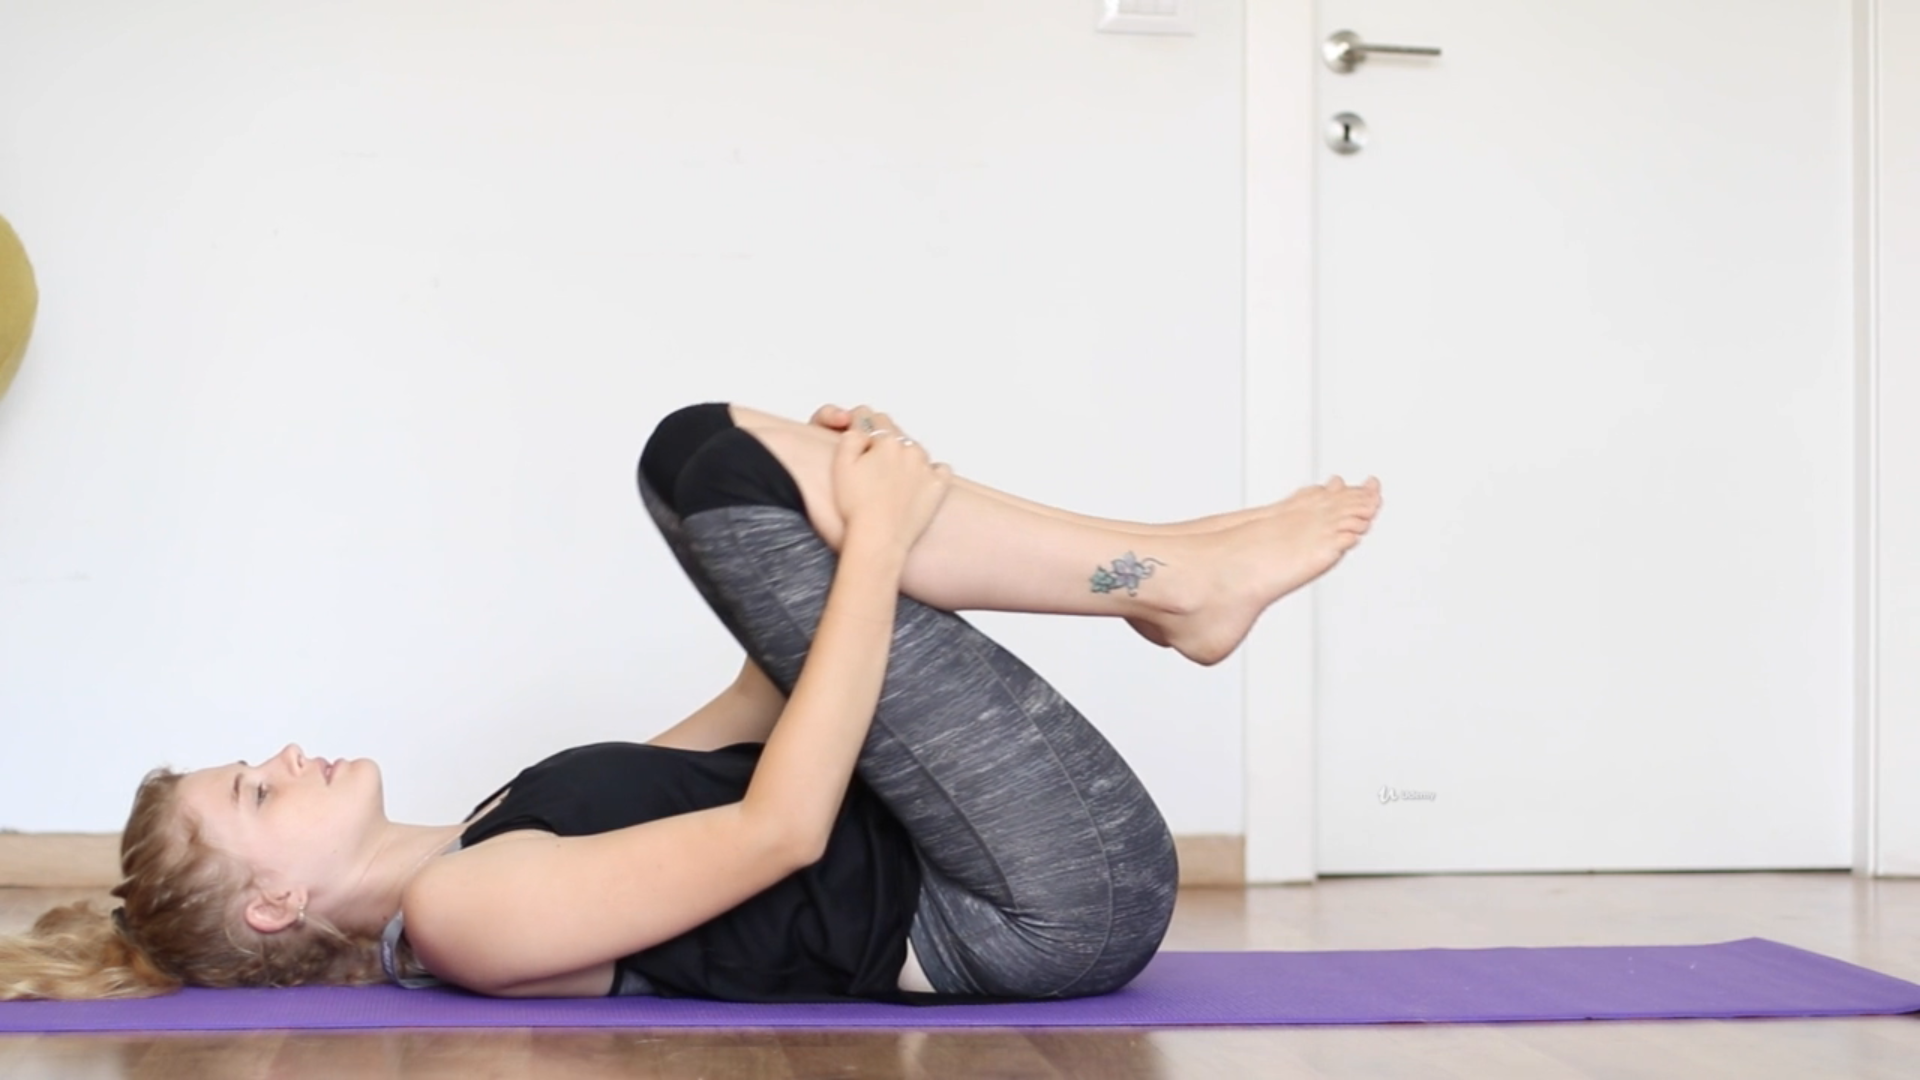
Now, these rotations are really pelvic rotations and you’re doing it to open up the joints and the cartilage in your pelvis and prepare yourself for the birth that’s coming. This is very important and increasing the flexibility of the birth canal and of the pelvic joints and muscles.
Start by laying down on your back with your hands flat on the floor beside you keep your feet flat on the floor as well and make sure that your lower back is connected to the floor beneath you. Stay in this position feeling the ground beneath you. Take some deep breaths to inhale and exhale. Really be connected to your body during this time listening to what each part of your body is telling you feeling the pressure of each part of your body with each breath.
Go ahead and bring in the right knee up to your hand. Guide it with your hands so that you don’t use too much stomach muscles and start doing rotations with your knee and hand together, counterclockwise. Five big rotations and then start rotating the other way clockwise.
Again your hand is guiding your knee this whole time. Make sure that you’re breathing with deep breaths when you finish but down your right knee and bring up your left knee with your hand guiding it. Once again start with counterclockwise circles five in one direction and then five circles clockwise in the other direction.
This time you want to bring both hands to your knees and start with internal rotations feeling the flexibility of your pelvic joints as you’re doing this, five internal rotations and then switch to do five external rotations. Big and slow movements and deep breathing with each one.
You want to get both knees together and you’re going to continue doing the circles this time with your legs moving synchronized together not in opposite directions as before. And once you’ve done five rotations this way you can just grab your knees and roll from side to side. From left to right feeling the release of your pelvis as you’re doing this release of your back muscles stretching out feeling the flexibility as you’re doing so.
Take deep breaths as you’re doing inhale on one side exhale on the other and slowly bring your feet back to the floor.
Yoga 5 – Pelvic raises
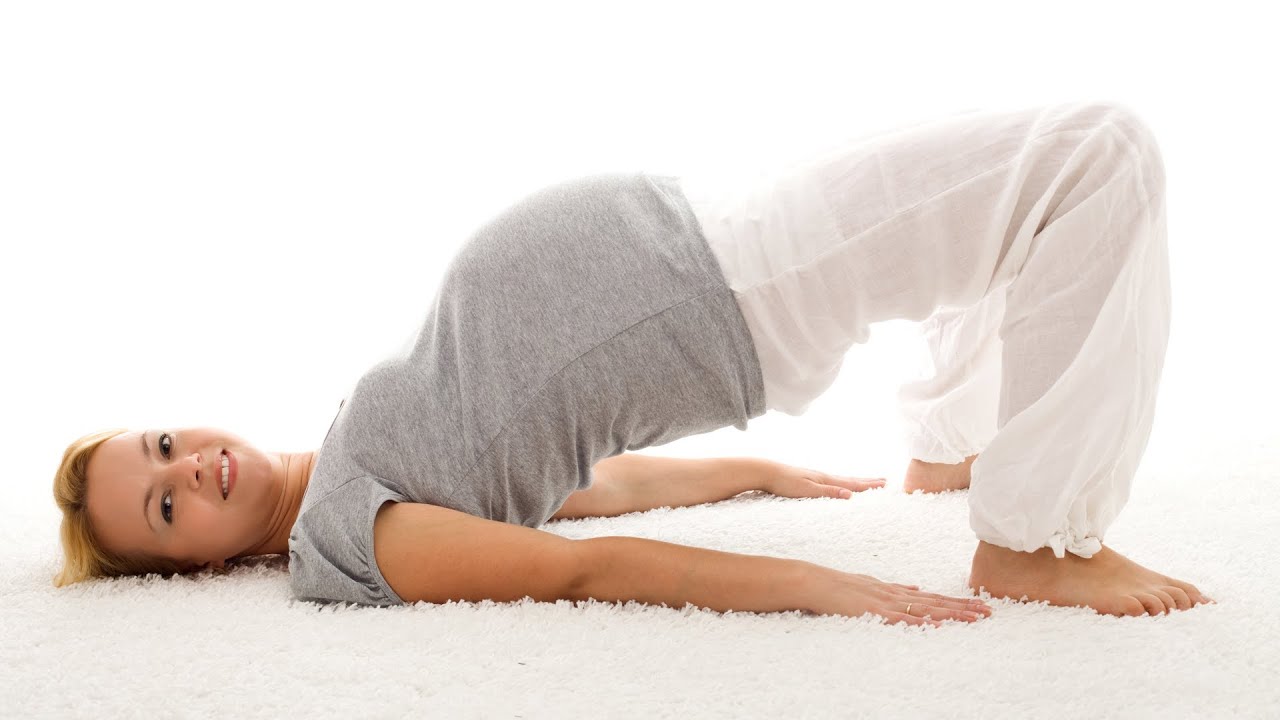
This is one of the exercises that comes a little bit more from the world of physiotherapy. It’s very important to do this exercise during pregnancy because it strengthens the pelvic floor, strengthens quadriceps and a number of other muscles that are used and can become strained or damaged if they’re not strong enough during pregnancy.
Lay on your back with your knees bent and your feet flat on the floor. Have your hands by her side and take some deep breaths. Roll your pelvis in and out, as you roll your pelvis in your lower back pressing against the floor. Then roll it back taking deep breaths with each movement.
Have your shoulders and your upper back also flat on the floor connecting your body right to the ground below you. Now when you’re ready to raise your pelvis into the air creating a straight line between your shoulders and your knees. Take a deep breath in as you release into the air and you raise your pelvis in so that the weight is put on your shoulders and the back of your neck.
After two deep breaths bring it back down and once again roll your pelvis out. After another deep breath roll back in and as you exhale lift your pelvis once again, creating a straight line between your shoulders and your knees, two more deep breaths in this position. And as you exhale bring your back down to the floor feeling your lower back pressed against the floor as her stomach pushes down
One more time brings the pelvic up creating that straight line between your knees and having the weight put on your shoulders in the back of your neck and your hands are pressed against the floor beside you. Keep breathing as you’re doing this exercise, connecting to your body has her doing so.
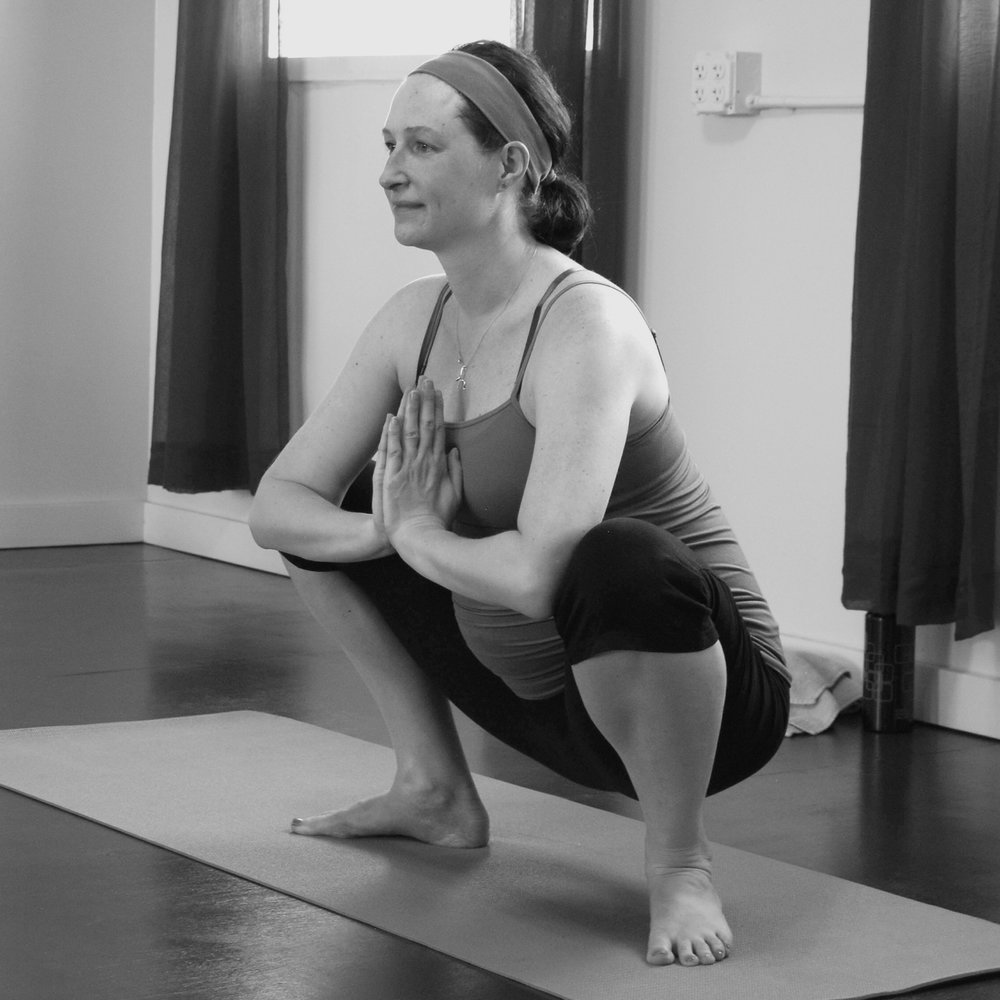
Yoga 6 – Tree
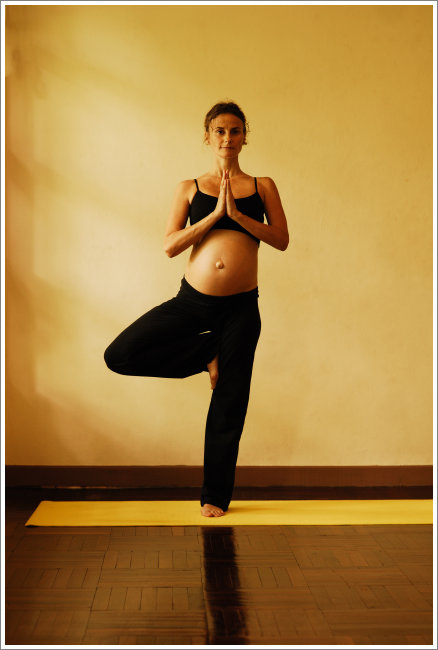
Usually, people don’t succeed on the first time they do this. But don’t worry if you do it a few times you will see, you will see your improvement. Keep practicing at it. This can really help you with your balance. Your center of gravity and helping your breathing connect to your body.
Stand straight with your back straight hands at your sides. Take a few deep breaths in this position and when you’re ready. Lift your leg and put it on your inner thigh. You want to try to bring your leg up rather high on your thigh. If you can’t do this it’s “OK” to rest it on your inner knee as well.
A lot of yoga exercises can be done with your eyes closed but this one specifically you should concentrate on one point on the floor to help you with your balance. Take some deep breaths with your hands by your chest and then lift them up high.
After taking deep breaths in each of these positions from back to the starting position. Taking a few more deep breaths and then switch legs. Once again bring up as high as you can to your inner thigh, take in deep breaths with your hands together by your chest.
Once you’ve found your balance point in this position raise your hands of your hand again. Concentrate on one point. Find your center of gravity really connecting with your body. Think about leg they stand on being the supporting pillar for your body. Don’t lock your knee as you’re standing. If you’re well long in the pregnancy, have a chair beside you for support.
Yoga 7 – Prayer of the sun
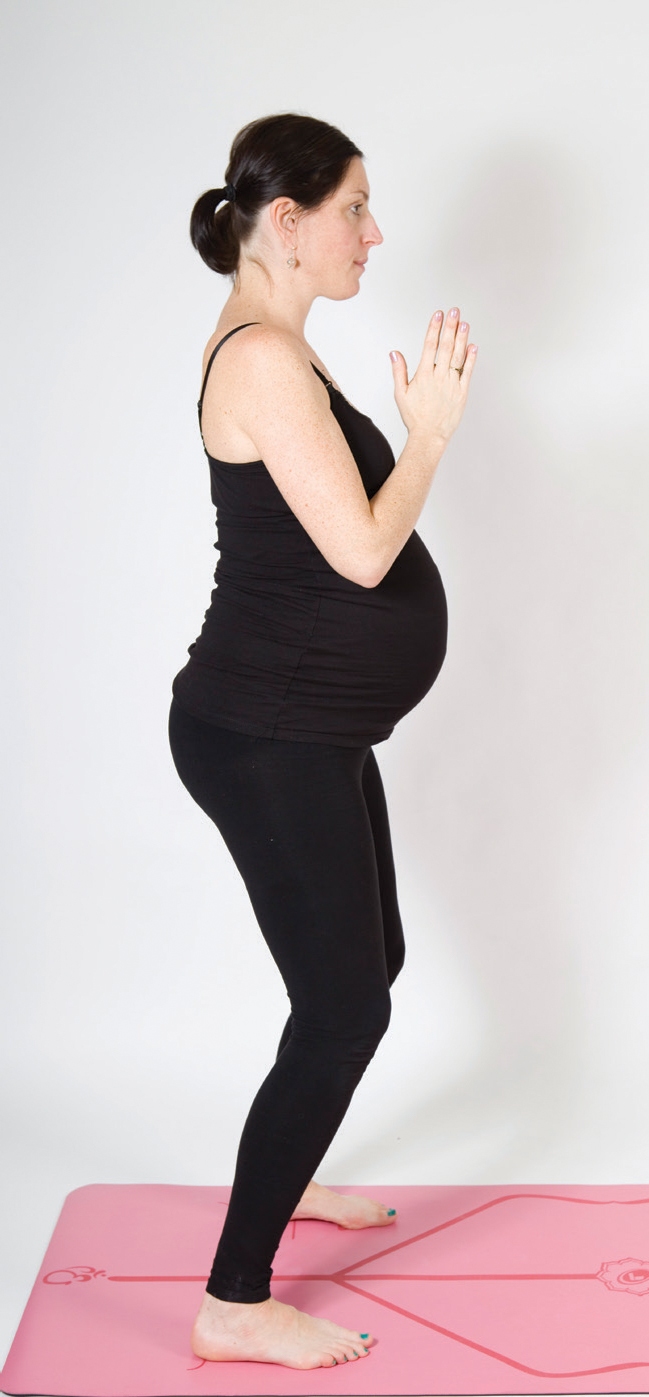
Now it’s a little bit different than the regular prayer of the sun in yoga because it’s modified for pregnancy. It’s great to release tension especially the tendons and muscles around your knees. You can do this when you wake up every morning or is a break if you’re sitting down for a long time at work.
Start with a base position hands together on the chest take a deep breath. This is position number one.
Now for number two, lower your hands to under your stomach with your palms pointing down. Take a deep breath in this position.
The next one, raise your hands so they’re pointing out straight at the sides. Another deep breath and then put your hands up above your head with your palms together and look up at your hands tilting your head back.
Next. Lean forward with your back straight. Your hands are coming pointing to the floor. Bring your hands down to the floor as you release the tension down.
Next, Archer back standing a little bit up as you continue leaning forward. Put your hands back up again. Coming back to the position where your head is tilted back bring your hands back to your sides and look forward and then come back to the position.
This has been the 10 positions for the prayer of the Son. It’s good to do this exercise about three times in a row again when you wake up in the morning or as a great break if you’re sitting down a lot at work.
Yoga 8 – The Frog
One of the biggest problems during pregnancy is the increased pressure of the internal organs because of the uterus that’s expanding pushing all the other organs to the sides of the abdomen. And this causes decreased blood flow throughout the body which can cause a number of problems in itself and constipation.
This next position that we’re going to do is great to help increase the blood flow and help release a little bit of the tension that all those organs feel. It’s called the frog position.
We start by putting your feet flat on the floor pointing outwards a little bit. Bend your knees sitting down on your ankles so that you find your center of gravity. To help you do this. You can take your elbows and push back a little bit on your knees creating a little bit of a stretch in the pelvic area with your groin muscles.
Take deep breaths as you’re sitting in this position and this is a good position to sit in even for a few minutes. If you succeed in doing so if it’s hard you can find up a rolled up towel or pillow put under your feet helping you stay forward a little bit on your toes. Remember to take deep breaths in this position.
Yoga 9 – Sitting on the wall, back on the floor

Laying on your back can be tough especially during the third trimester. So this position is best practice earlier in pregnancy during the first two trimesters. Another warning that I want to issue is to refrain from doing this exercise if you suffer from Symphony Elisa’s which is the separation of pelvic bones.
Start by laying on your back with your legs taped to the wall and then raise your legs creating a 90-degree angle with your hands by your sides. You want to keep your bottom side very close to the wall with your heels touching the wall as well. And this helps create that 90-degree angle.
This is the first of three positions that you will be doing in this exercise. Lay there taking a few deep breaths and with each time you exhale feel your stomach pressing down pushing your lower back to the floor.
Now move to the second position opening your legs until you feel the stretch in your groin muscles. But so it doesn’t hurt too much.
The third position is bringing your feet together with the soles of your feet touching and your knees bent and you want to move between the third and the second position a few times opening your legs and then bring in impact the other while taking deep breaths each time and again each time you exhale feel your stomach pushing down having your lower back press the floor.
This exercise does a great job releasing some of the tension in your pelvic muscles and your groin muscles and it really relaxes the pelvic floor and the spine.
You can do this one daily and each time you do it should get easier especially after a few times that you go over and over the exercise. It’s a really great exercise to do before you go to bed. And it can actually help you sleep better as well. It lowers the amount of varicose veins that you might have. And it lowers the chances of getting hemorrhoids and this type of stuff by increasing the blood flow to the areas which might not get some do to reduce blood flow during pregnancy.
So again this is a great exercise. Before you go to bed and during the early parts of pregnancy try not to do this in the third trimester but do it as much as you can daily in the first two trimesters and it will really help you with the advancement of the pregnancy.
Yoga 10 – Pelvic circles leaning on the wall
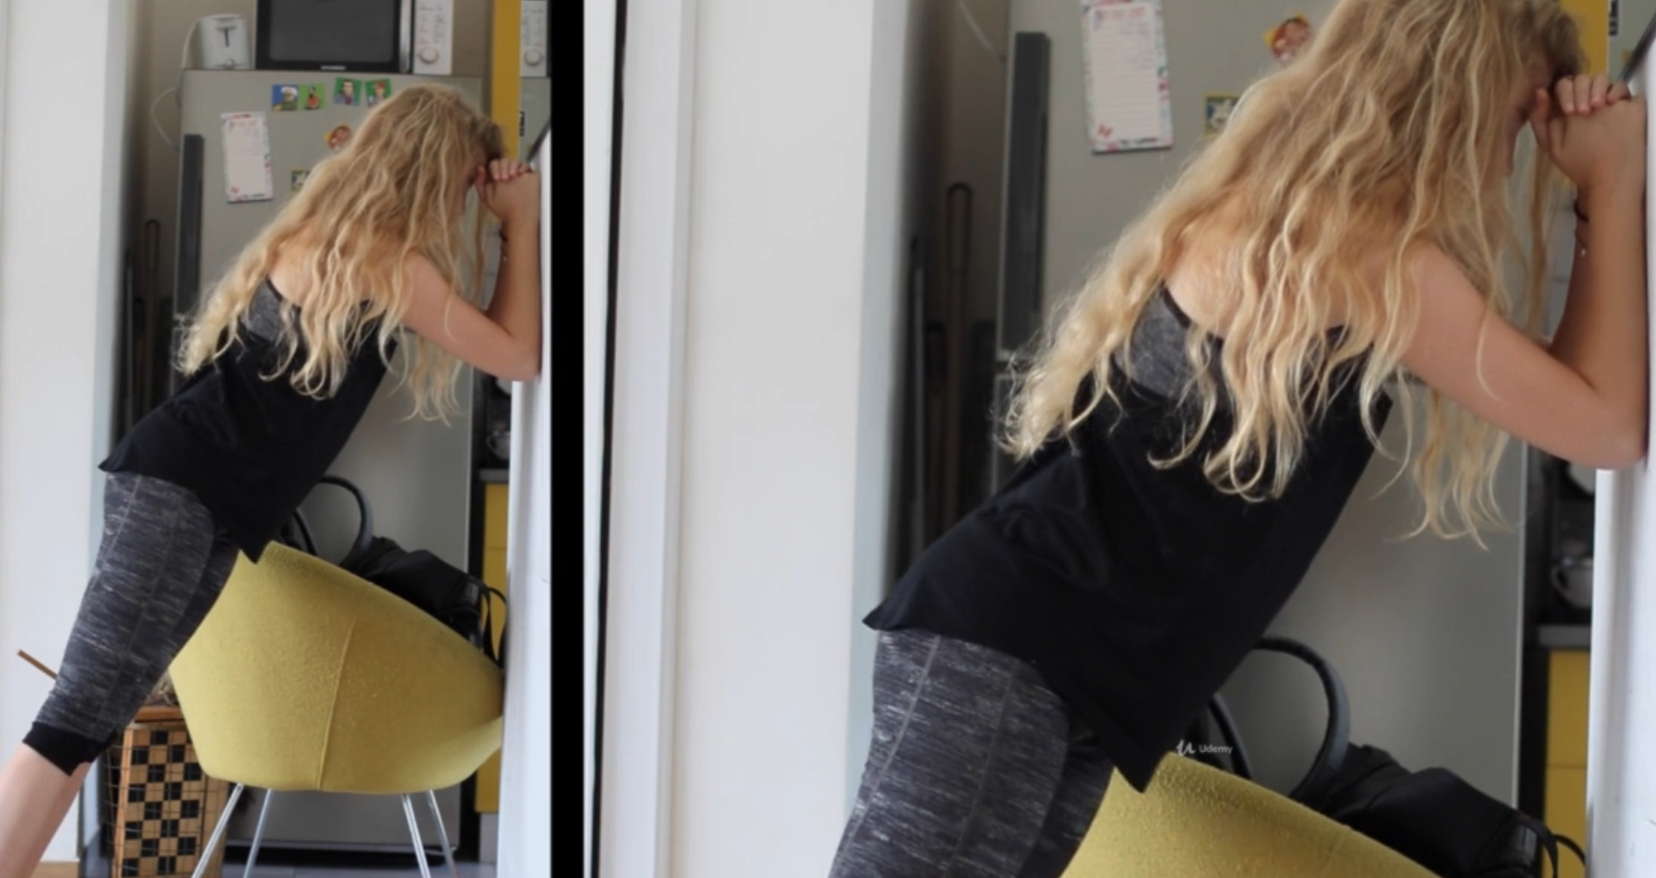
This is once again a great position for you to use while you have contractions, so doing it during yoga practice is really good to help entered into the muscle memory and become good at breathing having these positions and these exercises comfortable for you so that they’re easy to do when you’re feeling that it’s very hard and hurts.
You need to stand next to a wall to do this and while you’re a little bit away from the wall lean forward and put your hands straight on the wall. Large pelvic circles releasing the tension all around your pelvic area, your legs, your groin, and your stomach. If it’s more comfortable for you. You can lean on the wall with your forearms instead of your hands. Once you’ve done five big circles in one direction start them in the other direction.
Once you finish five circles to each side start in another side. Don’t put too much pressure on your hands. Breathe deeply releasing the tension from the pelvis in the groin as you do this exercise and it will really help you during contractions.